Help Center
EasyFlow Projects
1. Introduction
The following documentation gives you detailed information about EasyFlow Projects and describes all the necessary steps regarding installation and configuration for the successful use of the app.
If you need support at any point, please feel free to contact us by email at support@easyflowapps.com and we will help you immediately!
1.1. General features of the app
EasyFlow Projects offers you comprehensive project management functionalities directly in your own Salesforce environment:
- Simple and detailed planning of your projects - already at the quotation stage, which includes a time and personnel implementation planning
- Quickly set up a project team for implementation, as you can create your responsible project teams and assign the respective Salesforce users with just a few clicks
- Automatically create projects and subordinate tickets that can be assigned to your team members for processing
- By logging tasks and time spent by each individual project member, you can keep an eye on the current status of the project and have full control over the actual implementation status
- Project controlling during all stages of implementation, e.g. by automations running in the background, which provide aggregated statistical values at project level.
- Automatic support in the operational implementation of your projects through notifications, for example, of newly created projects, tickets or upcoming deadlines to the relevant team members
- Support of flat-rate billing and billing according to actual working time; flexibly define your preferred mode, also per sub-project, and use individual rounding logics for your time-based billing
This list serves as an overview. We will describe these functions individually and in detail throughout this documentation.
Note: EasyFlow Projects is available in both German and English. However, some parts of the Salesforce objects are not translated by default (e.g. names of list views). All untranslated text fields can be translated manually as desired.
1.2. Requirements for the use of EasyFlow Projects
In order to be able to use EasyFlow Projects, some requirements must be met. You can find out what these are in the following.
EasyFlow is based on the use of a Salesforce SalesCloud Enterprise Edition by default. Higher SalesCloud editions are of course also supported. The use of a Professional Edition is also possible. Your users can use EasyFlow with a SalesCloud or a Platform licence. Please note that with a Platform licence you do not have access to the Opportunity object and the Quote object, which are necessary for the creation of projects. However, your Platform licence users have access to all custom objects, i.e. projects, tickets and time tracking.
The functionalities "Notes", "Quotes" and "Path" must also be activated:
> To check this, go to "Setup"
> Enter "Quotes", "Notes" and "Path" in the quick search
> Check whether "Active" is set.
1.3. The interfaces of EasyFlow Projects
The interface for the configuration and use of EasyFlow Projects is composed exclusively of native Salesforce components. A distinction can be made between two views, one for the EasyFlow administrator and one for the EasyFlow user. The EasyFlow user only sees the user interface, but also has the option of working in the console view.
1.3.1. The administrator view
You will find the following tabs in the EasyFlow Projects Admin application:
| Tab | Description |
|---|---|
| Configurations | With the help of an "EasyFlow Projects Configuration" data set created during the installation, you regulate the basic configuration of the application. |
| Stage settings | Here you manage the automatic creation of a project depending on the opportunity stage. |
| Notification settings | Here you set up push notifications for one or more Salesforce users. |
| Roles | Here you create the respective roles in your project teams. |
| Ticket templates | Here you configure ticket templates that are automatically created (by assigning them to products) during project creation. |
| Products* | Here you can configure and create the products you offer. For project management products, you can use the "Project" product family. |
*Salesforce Standard Object
1.3.2. The user view
You will find the following tabs in the EasyFlow Projects and EasyFlow Projects Console application. Depending on your preference, you can choose between console and standard app view:
| Tab | Description |
|---|---|
| Home | On the home interface you will find current dashboards that provide an overview of the time worked and tickets for the current month as well as for the entire time. In addition, you will find list views of the currently open projects, tickets and time entries for which you are registered as a team member. |
| Accounts* | Here you can store the information about your customers as business accounts. |
| Contacts* | Here you can store information about the people you want to do business with. Contacts can be assigned to accounts. |
| Opportunities* | Opportunities are deals in progress; here you can track your potential deals. Opportunities are linkable to accounts. |
| Quotes* | Quotes represent the suggested prices of your company's products and services. Quotes are created via an opportunity and its opportunity products.. |
| Projects | Here you can manage your projects. All project phases can be mapped, from the composition of your project members and implementation planning to management and controlling. |
| Tickets | Here you can manage the individual implementation steps of a project and tasks divided into tickets with responsibilities and estimated time required. The tickets are assigned to the corresponding project. |
| Worklogs | Here you can store the time spent in the context of a ticket. This allows for simple and accurate time tracking in your projects. |
* Salesforce standard object
2. Installation and setup
To use EasyFlow Projects, some preparatory steps are necessary. These include the installation of the tool itself, but also further configurative measures, which we describe in this chapter.
Note: When purchasing an EasyFlow Projects licences, we offer a free set-up service! Please contact us by e-mail at support@easyflowapps.com or call us at +49 (0)800 25 68 396.
2.1. Installation
EasyFlow Projects are installed via the AppExchange.
When you are on the installation page, select "Administrators only". This selection is necessary, as otherwise non-authorised users could gain access to sensitive data!
 X
X
Click on "Install" and confirm the message "Yes, grant access to these third-party websites".
Within the scope of the installation, release must be granted for addressing different interfaces. Click on "Next" to start the installation.
Once your installation is complete, you will find all the components associated with the package in your Salesforce org. You can recognise them by the "EasyFlow Projects" namespace.
A notification may appear with the following content: "The installation of this application takes some time. You will receive an email when the installation is complete." If this is the first time you've seen such a message, don't worry. Just click "Done." Salesforce will then email you to let you know if the installation was successful.
Once the installation is complete, we recommend checking the installation in the "Packages" area under "Installed packages" in Salesforce Setup.
2.2. Granting of rights of use
The use of the application requires the assignment of certain rights to desired Salesforce users. A basic distinction is made here according to the type of use:
- EasyFlow Projects licenses
- Salesforce permission sets
EasyFlow Projects licenses are assigned in the "Installed Packages" section, directly at the EasyFlow Projects package listed there. To do this, click the "Manage licenses" button and assign the desired users.
Salesforce permission sets are assigned separately. The following types of Salesforce permission sets are basically distinguished in EasyFlow Projects:
- EasyFlow Projects-Admin: for full administrative access to all areas of the application
- EasyFlow Projects User: for user access to EasyFlow Projects and Console app
To assign these permission sets, search for "permission sets" in the setup.
Search in the list for „EasyFlow Projects admin“ and „EasyFlow Projects user“ and click on the respective set of permissions you want to assign to a user.
Go to "Manage Assignments" and add the desired users by checking the checkbox.
IMPORTANT: It is also essential to share the dashboards and reports that come with EasyFlow Projects by default. To do this, please go to the standard tabs for "Reports" and "Dashboards" in the Salesforce interface and in each case (!) in the sharing settings of the " EasyFlow Projects" folder added with the installation of EasyFlow Projects, share it with the group of all internal users. You can find this sharing option as follows:
Search via the Reports or Dashboards search function > All Folders > EasyFlow Projects > Share (using the arrow function on the right). If this step is missed, the millio app homescreen will not display correctly for users without an administrator license.
2.3. Configuration and customisation of standard objects
Since Salesforce does not support automatic adjustments to standard objects when installing applications such as EasyFlow, this must be done manually once after installation. This way, EasyFlow Projects seamlessly adapt to your Salesforce standard.
Note: We offer a free set-up service as part of the EasyFlow Projects licence purchase. Feel free to contact us or send an email to support@easyflowapps.com!
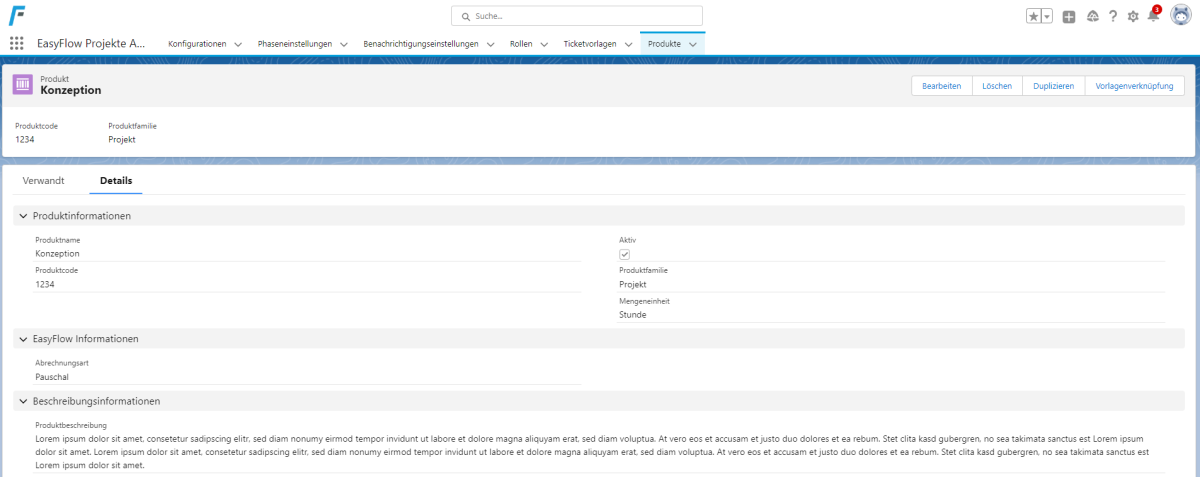
2.3.1. Customisation of the standard object "Product"
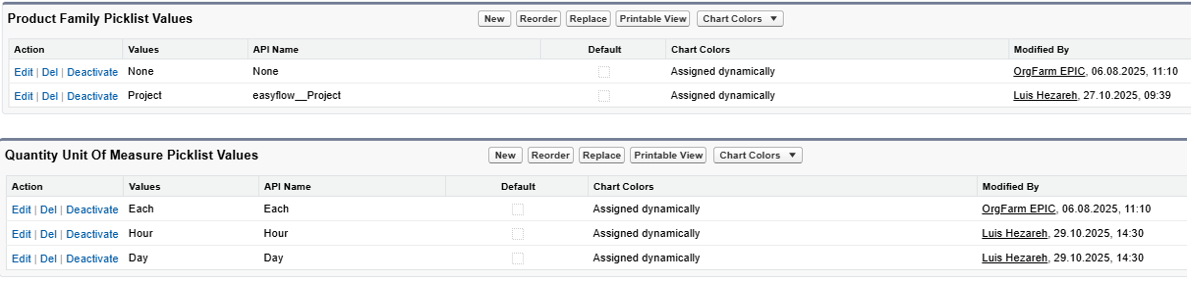
To customise the product, click on the tab "Products" > "Setup" > "Edit Object". Then search for the field "Product family" under "Fields and relationships". Then add the selection list value "Project". You can then call up the field "Quantity Unit of measure" and create the selection list values "Hour" and "Day".
Note: For the EasyFlow automations, it is important that the API names of the selection list values are as follows:
- For the selection list value "Project", the API name must be "easyflow__Project".
- For the selection list value "Hour", the API name must be "Hour".
- For the selection list value "Day", the API name must be "Day".
You can freely determine the label of the selection list values. Also make sure that the selection list value is activated.
 X
X
Finally, you can customise the page layout. Here you should add the button "Edit template relations" as a user-defined button under "Buttons".
In addition, you should add the "Billing type" field provided by the installation of EasyFlow Projects to the layout. Now you can add the related list of ticket templates to the layout. Here you can view all ticket templates that are assigned to the product via the "Edit template relations" button.
2.3.2. Opportunities
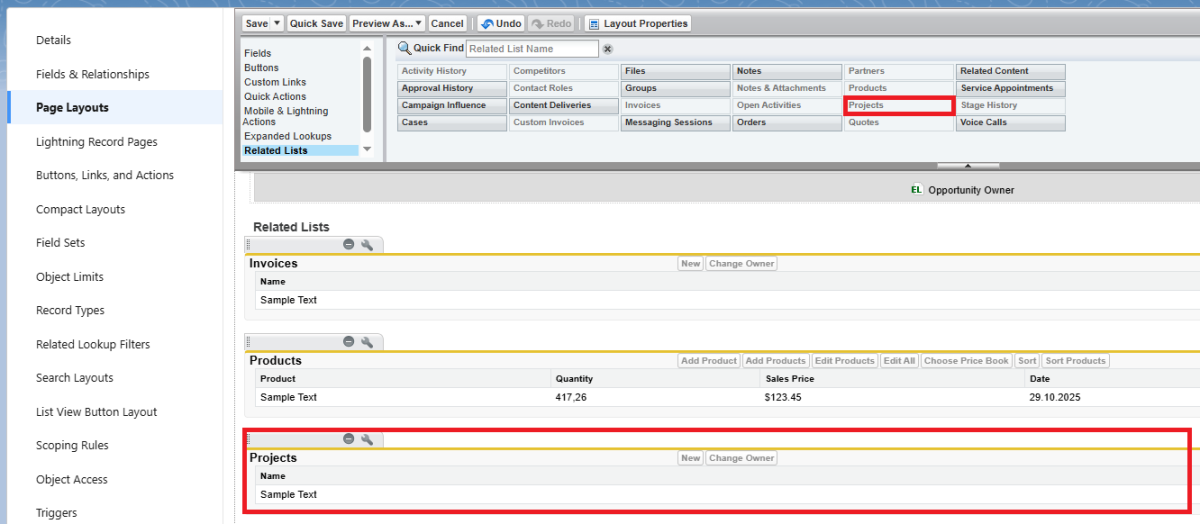
In order to have relevant information about the project also in view on the opportunity, you should add the related list "Projects" to the opportunity page layout via "Setup" > "Edit object" > "Page layout" on the opportunity tab.
 X
X
2.3.3. Opportunity Product Page Layout
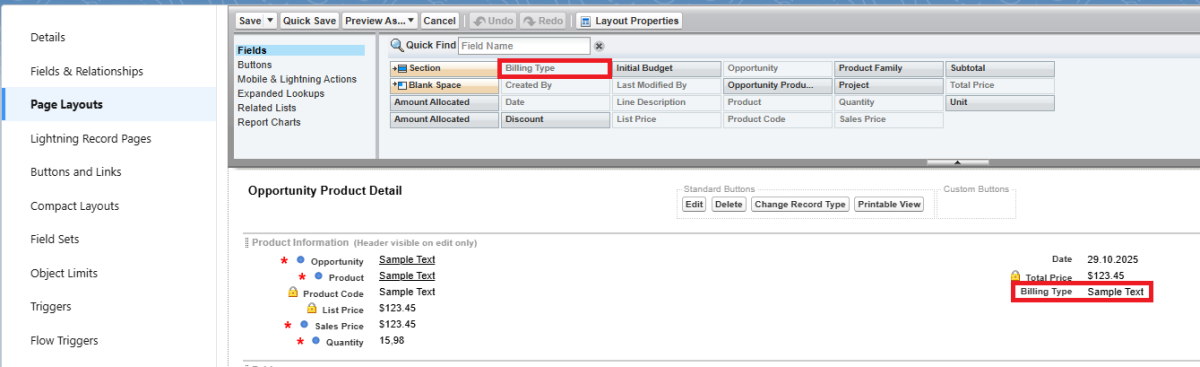
In order to have relevant information about your offered project components and fields on the respective opportunity product in view, you should add the field "Billing type" provided by the installation of EasyFlow Projects to the layout. To do this, go to "Setup" > "Object manager" > search for "Opportunity product" > go to "Edit" > "Page layout" and add the field. Afterwards you can add the related list "Subprojects" to the opportunity page layout.
 X
X
2.3.4. Quotes
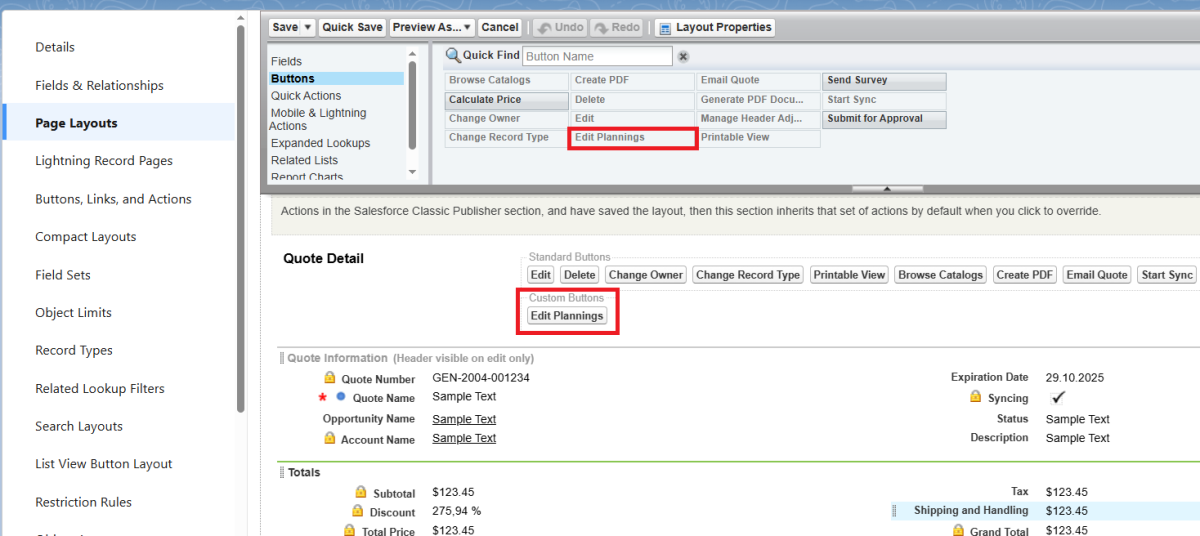
To easily create your quote and prepare your project in detail, you should add the button "Edit Plannings" on the object "Quote". To do this, go to "Setup" > "Object manager" > search for "Quote" > go to "Edit" > "Page layout". Search for the "Edit Plannings" button and add it as a custom button.
 X
X
Also, search for the "Planning" related list and add it to the layout as well.
 X
X
2.3.5. Quote line item
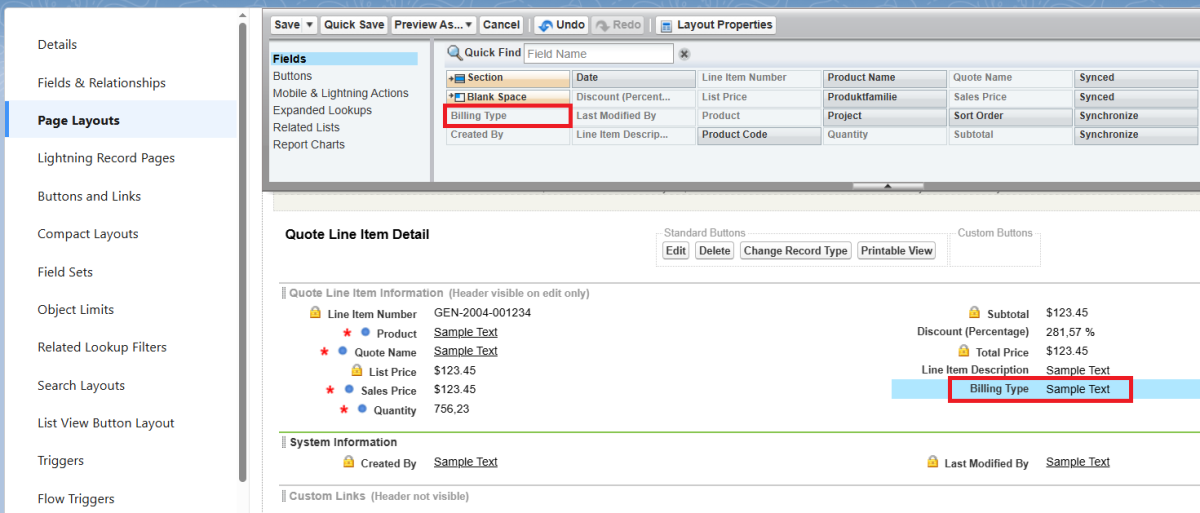
You can also add the field "Billing Type" to the page layout in the "Quote line items". To do this, go to "Setup" > "Object manager" > search for "Quote line item" > go to "Edit" > "Page layout".
 X
X
2.3.6. Configuration of list views
We recommend that you go to the tab "Tickets" and bring the list view "All tickets" and "My tickets" into Kanban view. To do this, click on "View as Kanban" at the top right of the list and enter "Estimated Hours" as the sort order and "Status" as the grouping.
2.4. Management of the configuration data set
The first step in configuring the app is to manage the configuration data set. By default, default settings are stored in the configuration data set so that the app can be used directly. However, these settings can be freely configured according to your own requirements.
First, search for the „EasyFlow Projects admin“ app in the App Launcher or via the search function. Switch to the "Configuration" tab. Here you can create one-time entries for the basic configuration parameters in the data set.
The following fields can be configured:
| Field | Type | Description |
|---|---|---|
| Automations | Formular Field | Should be ticked by default. Shows whether time-based automations (see also notification settings) are activated. Activation can be carried out via the "Automations" button. |
| Type of Billing | Mandatory | Here you can configure the default billing type for newly created products. It is possible to bill according to time worked or according to flat-rate hours offered. |
| Rounding logic | Mandatory | Here you can configure the logic for time entries, according to which the time worked at ticket level is rounded up for billing. |
| Unit of measure | Mandatory | Here you can define the default unit offered for newly created products (hour or day). |
| Project threshold | Optional | Here you can configure the number of days (numerical entry) before the end date of a project with the status "In implementation" to trigger a notification. The default setting is 14 days. |
| Ticket threshold | Optional | Here you can configure the number of days before the closing date of a ticket with the status 'Open' or 'In progress' to trigger a notification. |
Note: For a notification to be triggered by one of the thresholds EasyFlow requires that the corresponding notification settings are set up and active. You can find more information about notification settings in section 2.5.
2.5. Manage stage settings
You have the option to configure the automatic creation of projects based on the respective opportunity stage. By default, we have created a stage setting for you already, which creates a new project record for every opportunity with the stage "Closed Won". If you map an individual sales process through specially created opportunity stage, you should adjust your stage setting or create a new one.
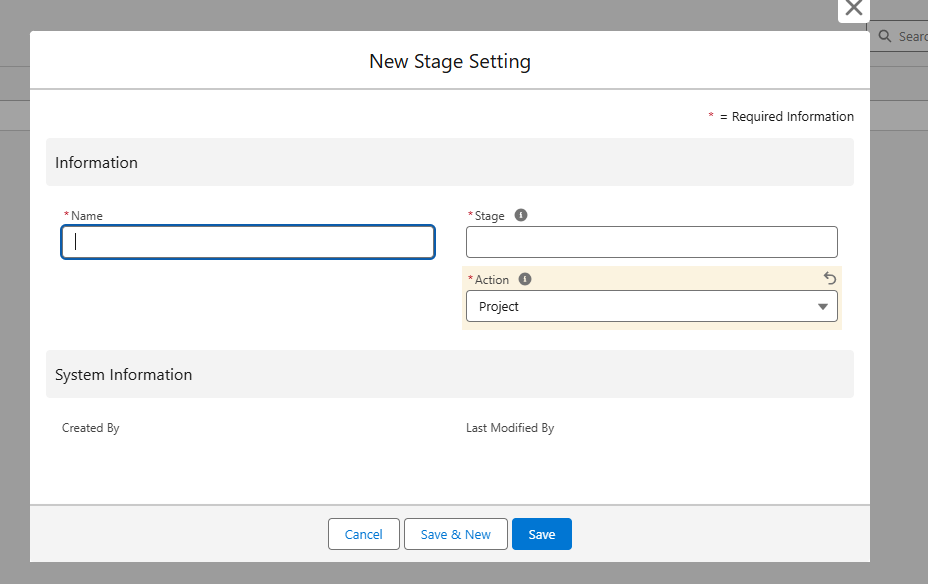
To create another stage setting, click on "New" in the top bar in the stage setting section and fill out the following fields in the newly opened window:
| Field | Type | Description |
|---|---|---|
| Name | Mandatory | Here you can enter a freely selectable name for your stage setting. |
| Stage | Mandatory | Here you can enter the name of the opportunity stage for which a project record is to be created. |
| Action | Mandatory | Defines the record to be created when the corresponding opportunity stage is reached. By default, "Project" is set. |
 X
X
2.6. Set up notifications
Push notifications for one or more Salesforce users can be set up via "Notification Settings". Push notifications are generated in the following cases:
- On successful allocation of incoming e-mail messages.
- On automated creation of "project" records.
- When the user is assigned as a project member.
- When the user is assigned to a ticket.
- When the ticket threshold (see 2.3 configuration record) of a ticket to which the user is assigned is reached.
- When the project threshold (see 2.3 configuration record) of a project to which the user is assigned as a project member is reached.
To set up push notifications, click the "Notification Setting" tab and then the "New" button in the "Notification Settings" list to create a new "Notification Setting" record.
| Field | Type | Description |
|---|---|---|
| User | Mandatory | The Salesforce user to be notified. |
| Events | Mandatory | Here you can define the events for which notifications are to be triggered. Possible events are: "New project"; "New project member"; "New ticket"; "Due project"; "Due ticket". |
| Active | Optional | Defines whether the notification setting is active. |
2.7. Manage roles
Roles allows you to create all of the project roles and responsibilities held by employees of your company. Within the framework of a project, project members can then be added on the basis of specific roles. Employees can also be assigned to project tasks in the form of tickets based on specific roles. This can be pre-configured by assigning specific roles to certain tasks in the ticket templates (see the following step "Creating ticket templates").
We recommend that you create all roles that exist in connection with projects in your company.
| Field | Type | Description |
|---|---|---|
| Name | Mandatory | Here you can enter the respective role description in a free text field, e.g. Project Manager, Tester, etc. |
| Hourly rate (internal) | Optional | Here you can enter the internal hourly rate that is estimated for the employee with this specific role. This is relevant for the margin analysis at project level (internal costs versus income). |
2.8. Add Team Members
In the “Team members” section, you can now create entries for your team so that you can assign people to projects later. To create a new team member, click on ‘New’ in the “Team members” section.
 X
X
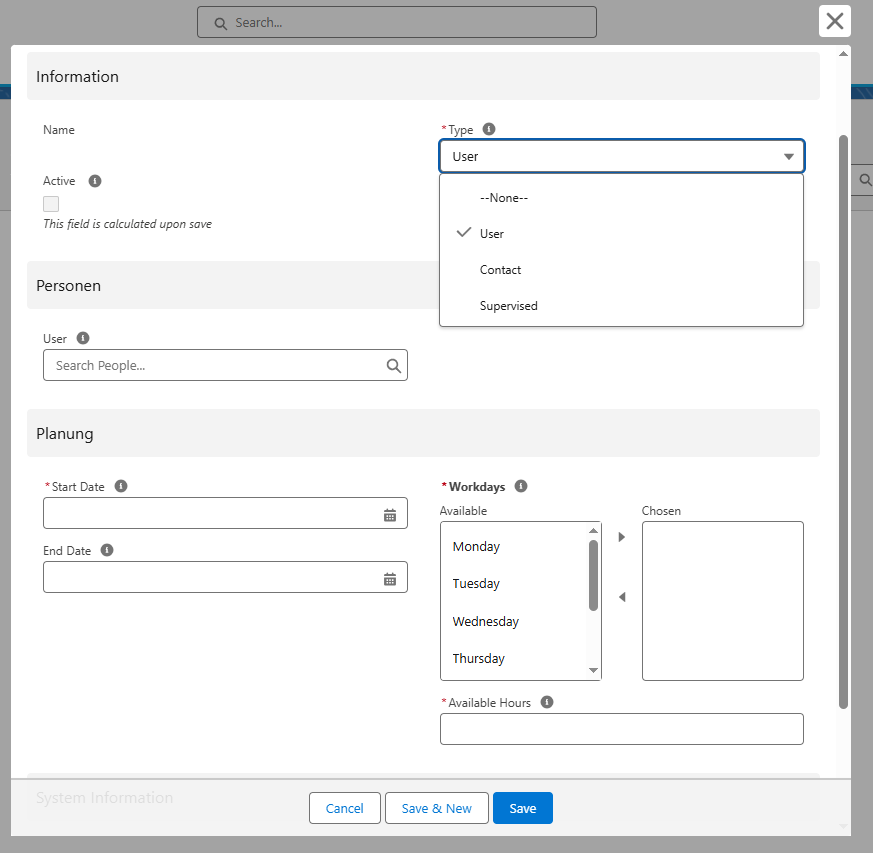
You can make the following configurations for a team member:
| Field | Type | Description |
|---|---|---|
| Type | Mandatory | Here you can select whether your team member is stored as a user or as a contact in your Salesforce organization. |
| People | Mandatory | In the “People” section, you can now specify the actual team member from your Salesforce organization. |
| Start date | Mandatory | Here you can define the start date of the person as a team member. |
| End date | Optional | Here you can define the end date of the person as a team member. To mark a team member as permanent, leave the field blank. |
| Workdays | Mandatory | Here you can use the arrow keys to define the working days of the team member. |
| Available hours | Mandatory | Here you can define the available working hours of the team member per planning period. |
After you have completed the configuration, click “Save” to create the team member.
In the team member's record in the "Competences" section, you can now assign roles to the team member. This helps you to have a structured overview over the team member's roles later when assigning tickets.
2.9. Create ticket templates
Tasks that arise in the project can be created via ticket templates.
If ticket templates are stored, they can be easily assigned to your products. They are then assigned to the project as tickets when the project is created (see "Creating products"). We recommend creating all ticket templates, i.e. all task areas that arise by default in your operative project business, in a first step in order to create and manage projects efficiently and in a time-saving manner in the following.
| Field | Type | Description |
|---|---|---|
| Topic | Mandatory | Here you can enter the topic of the ticket template (task template), e.g. Testing. |
| Role | Optional | Here you can define the project role that is responsible for completing this task, e.g. tester. For this, you must have created roles in a first step (see item "Managing roles"). |
| Description | Optional | Here you can enter a description for the ticket template. |
2.10. Creating products
Via the standard object "Product" you can create your products of the product family "Project" (see 2.3.1. "Customisation of the standard object "Product"") and link them to the ticket templates you have created via the button "Template link".
If, for example, you have created "Project Management" as a product or service and for this you have created the ticket templates "First Requirement Assessment", "Project Control" and "Final Presentation", you can link these tasks with the product. If this product is then offered in an opportunity, the individual task steps are displayed in the offer for the offer document item "Project management" under the related list "Planning". If a project order is then created from the opportunity or the offer, the tickets are created in the project (see "Creation of a project").
Note: Finally, you should add your products to a price book. Make sure that both the product and the price book are ticked with "Active".
 X
X
2.11. Trial version
You have the possibility to test EasyFlow Projects completely free of charge for 30 days. You do not need any credit card information. After 30 days, the test phase expires automatically and you can no longer access EasyFlow Projects.
If you want to test EasyFlow Projects in a sandbox, the installation process works exactly as in the live environment.
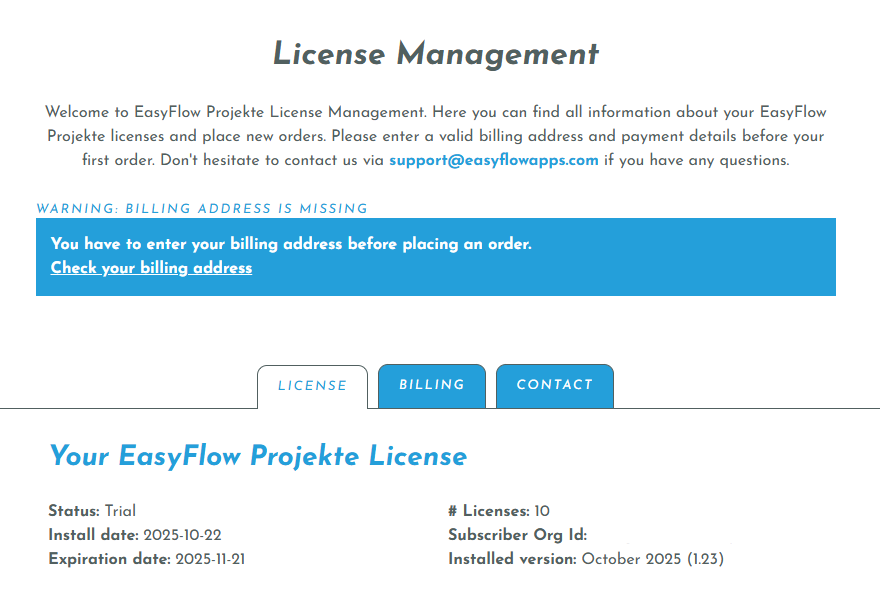
2.12. Order licenses
This step is especially important so that you can use EasyFlow Projects permanently!
The licence fees for the use of EasyFlow Projects will be collected by direct debit from the account you specify. This is how you can deposit your corresponding information:
> In the EasyFlow app you will find the button "Manage licences" in the "Configuration" tab. Clicking on the button opens a login page to your licence management area. In this customer portal you will find all the important data on your EasyFlow licences, payment information and also the option to book additional licences with a click.
> To log in, you will receive an individual code by e-mail, which you enter in the login mask.
> After logging in, the overview page opens with some information about what you need to tell us so that you can use EasyFlow in the future.
 X
X
> Click on "Check your billing address". There you can enter a valid billing address. Then click on "Check your SEPA direct debit mandate" to issue a valid SEPA direct debit mandate. You can also find the input masks for your data below in the "Billing" and "Payment" tabs.
> After you have entered and saved the necessary data, you will receive an e-mail confirmation and a document with all the information about your SEPA direct debit mandate.
Note: The confirmation email will be sent to the email address specified during the EasyFlow download in the Salesforce AppExchange.
3. Important interfaces for operational use
Below you will find a detailed explanation of the object surfaces and their fields.
3.1. The Project Record
On the project record you will find three tabs: Members, Details and Controlling. In addition, various dashboards are displayed to give you a graphically well-structured overview of the project's progress in real time.
You will find the following fields on the "Details" tab:
| Field | Type | Description |
|---|---|---|
| Name | Mandatory | Here you can define a name for your project. |
| Opportunity | Mandatory | Refers to the opportunity in which the project was offered. |
| Account | Formular Field | Refers to the client account to which the project is assigned. |
| Status | Mandatory | Here you can enter the status of the project. The status changes automatically from "Open" to "In Planning" when you have added project members. |
| Description | Optional | Here you have a text field in which you can enter a project description. |
| Members | Formular Field | Here you can see the number of project members assigned to the project. |
| Member | Formular Field | Here you can see whether you are a project member yourself. |
In the "Controlling" tab, you can find the following fields:
| Field | Type | Description |
|---|---|---|
| Starting date | Formular Field | Here you can see the start date of the first ticket assigned to the project. |
| Ending date | Formular Field | Here you can see the start date of the last ticket assigned to the project. |
| Hours offered | Formular Field | Here you can see the effort offered in the entire project in hours. The value that appears here was added up as a quantity from the assigned sub-projects (which were created from the products offered). |
| Estimated hours | Formular Field | Here you can see the estimated effort in hours. The value that appears here was added up from the assigned subprojects as a quantity. When creating the offer, you can enter the estimated hours via the "Project planning" button or via the "Implementation planning" button at project level. |
| Planning deviation | Formular Field | The difference between the hours offered and the estimated hours. A negative value means that the estimated effort is less than the offered effort. You can also see the planning deviation in the implementation planning interface. |
| Rounding logic | Optional | By default, you see the rounding logic for time entries stored in the configuration data record. However, you can adjust this manually for the project. |
| Start of time tracking | Formular Field | Time of the first time tracking assigned to the project. |
| End of time tracking | Formular Field | Time of the last time recording assigned to the project. |
| Last closing date | Formular Field | Last completion date of all tickets assigned to the project. |
| Minutes worked | Formular Field | Shows the total effort in minutes of the project logged by associated time records. |
| Rounded minutes | Formular Field | Shows the total effort of the project logged by associated time entries according to the stored rounding logic in minutes. |
| Hours worked | Formular Field | Shows the total effort in hours of the project logged by associated time records. |
| Rounded hours | Formular Field | Shows the total effort of the project logged by associated time entries according to the stored rounding logic in hours. |
| Completed hours | Formular Field | Shows the effort completed so far in hours. The value that appears here corresponds to the sum of all completed hours of the tickets belonging to this project. For this purpose, the field "Rounded hours" is aggregated on ticket level. If the estimated and thus offered hours are lower than the actually logged hours, the value of the rounded hours is taken over so that the completed hours are not higher than the actually offered hours. |
| Completion | Formular Field | Shows the achievement of project completion to date measured as a percentage of hours completed to date in relation to the estimated hours for the project. This assumes that "Estimated hours" have been deposited at ticket level as part of the implementation planning. |
| Days until end date | Formular Field | Displays the remaining number of days until the end date of the project. |
| Billable hours | Formular Field | Shows the total billable hours. For the settlement type 'Flat rate' at subproject level, the estimated hours flow in here. For the billing type 'Time' at sub-project level, the actual logged, rounded hours flow in here. Sub-projects are created from the products offered in the opportunity (offer document items) and work orders (plans) linked to them. For more information, see "Automatic creation of a project". |
| Billable sum | Formular Field | Displays the total billable hours multiplied by the respective hourly rate defined on Opportunity Product ("Sales Price" field). |
| Budget deviation | Formular Field | Shows the difference between the billable and the offered hours. This means that you can see from this value how much budget is still available in the project. |
| Total costs (internal) | Formular Field | Shows the total cost of the work performed. The value is calculated from the billable hours multiplied by the respective internal hourly rate. The internal hourly rate can be stored when creating the roles (see "Managing roles") and is determined according to the role of the agent on the ticket. |
| Margin (absolute) | - | Shows the difference between the billable total and the total costs (internal). |
| Margin (percentage) | - | Is a percentage view of the margin and is calculated from margin (absolute) divided by the billable total. |
Note: If the field "Completion" shows 0% despite existing worklogs, this may be due to the status of the project. Projects that are in either the "Open" status or the "In Planning" status are, by definition, 0% complete. To track progress accurately, set the status to "In Realization".
You can find the following dashboards to visualise your project progress:
| Type | Description |
|---|---|
| Tickets by agent and status | Enables an overview of project members and tickets per project member of the project in the corresponding status. |
| Tickets by status | Enables an overview of all tickets assigned to the project according to status. |
| Tickets by completion | Enables an overview of all tickets assigned to the project after completion. |
 X
X
 X
X
 X
X
In addition, you can find several related lists on the project record, which allow you to access the different related records of the project directly from the record interface. These include:
- Notes
- Files
- Project Members
- Sub-projects
- Tickets
- Overview of the projects' history
3.2. The Sub-project Record
A sub-project is created from each quotation document item of a quotation of an opportunity when the project is created. However, these sub-projects are only created if the product family is "project" and the offer is the synchronised offer. In this case, tickets are created from the task steps that are linked to the offer via planning, which are assigned to the corresponding sub-project.
Note: The sub-project record is created automatically when the project is created, the field values do not need to be edited or adjusted. The sub-project record enables project accounting by individual products. This also allows settlement within a project by time and lump sum, according to the defined settlement type per subproject, which is taken over from the quotation document item. If desired, the subproject related list can be hidden from the project page layout.
On the sub-project record you will find two tabs: "Details" and "Controlling". On the "Details" tab you can find the following fields:
| Field | Type | Description |
|---|---|---|
| Name | Mandatory | Fills automatically with the name of the product offered. |
| Opportunity Product | Mandatory | Refers to the corresponding opportunity product record. |
| Sorting | Optional | Defines the order in which subprojects are added to projects. The order is based on the previously made sorting of the products in the offer. |
| Description | Optional | Here you have a text field in which you can enter a sub-project description. |
In the “Controlling” tab, you will find the same fields as in the ‘Controlling’ tab of the project record, only with data related to the progress of the subproject. The only difference is the “Billing type” field, where you can view and edit the selected billing type. You can access the assigned tickets and store notes and files using the related lists.
3.3. The Ticket Record
On the ticket record you will find two tabs: Details and Controlling. In addition, you can use the "Time tracking" button to open an interface that allows you to easily log the time you have spent on the ticket (see "Time tracking on tickets").
 X
X
You will find the following fields on the ticket record:
| Field | Type | Description |
|---|---|---|
| Name | Auto Number | Ticket number. This is assigned automatically when the ticket is created. |
| Topic | Optional | Here you can enter the subject of the ticket, e.g. concept. |
| Status | Mandatory | Here you can enter the status of the ticket. Possible statuses are "Open", "In progress", "Closed" and "Cancelled". Note: You can only close a project if all tickets assigned to the project have been closed. |
| Role | Optional | Here you can see the role of a project member who is responsible for the corresponding ticket. Note: The role defined here restricts the selection of possible project members for implementation planning. This means that only project members with a matching role can be added to the ticket! |
| Sorting | Optional | Determines the order in which the tickets are assigned to the project. |
| Project | Formular Field | Refers to the project to which the ticket is assigned. |
| Sub-project | Optional | Refers to the sub-project to which the ticket is assigned. |
| Planning | Formular Field | Refers to the corresponding planning record through which the ticket was assigned to the project on offer level. |
| Responsible person | Optional | Here you can assign a project member depending on the role that is responsible for the corresponding ticket. The easiest way to do this is via the implementation planning at project level. |
| Name of Responsible Person | Formular Field | Here you can see the name of the project member who is responsible for processing the ticket. |
| Description | Optional | Here you have a text field in which you can enter a project description or other relevant information. |
In the “Controlling” tab, you will find the same fields as in the "Controlling" tab of the project data record, only with data related to the progress of the ticket. The only difference is the “Billing type” field, which shows you the billing type selected in the assigned subproject.
Note: The "Billing Type" field of the ticket record is read-only. You can only edit the billing type via the related sub-project.
3.4. The Worklog Record
On the worklog record you will find two tabs: Details and Controlling.
You will also find the following fields:
| Field | Type | Description |
|---|---|---|
| Name | Auto Number | Number of the worklog, is automatically assigned when a worklog is created. |
| Ticket | Formular Field | Refers to the ticket record to which the worklog is assigned. |
| Project | Formular Field | Refers to the project record to which the worklog is assigned. |
| Responsible Person | Optional | Refers to the responsible person, i.e. the project member who created the worklog for the corresponding ticket in order to log the time spent. If you click on the "Edit Worklog" button, the current user who created the worklog is automatically saved. |
| Comment | Optional | Here you have a text field in which you can leave a comment. |
| Start | Formular Field | Here you can see the starting point of the worklog. |
| Ende | Formular Field | Here you can see the end point of the worklog. |
| Open Minutes | Formular Field | Displays the past minutes since the start of the worklog as long as logging is not yet finished. |
| Open Hours | Optional | Displays the past hours since the start of the worklog as long as logging is not yet finished. |
| Minutes Worked | Formular Field | Displays the minutes worked between the start and end of logging. |
| Hours Worked | Formular Field | Displays the hours worked between the start and end of logging. |
As for the other records, you can find related lists for notes and files in the worklog record.
4. Operational Use
In this chapter, we describe how you can get the most out of EasyFlow Projects. Below you will learn how to create your first project automatically, how to add project members to create your project team and how to manage the implementation of your project.
4.1. Creating a Project
4.1.1. Creating an Opportunity and Adding Opportunity Products
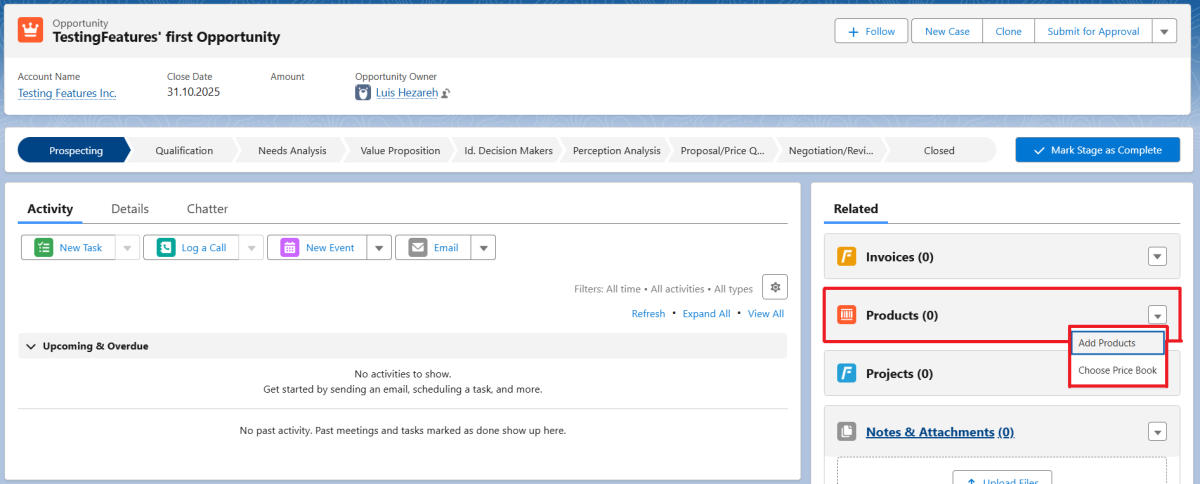
Create a new opportunity for a customer account and add the products that you would like to implement or sell to the customer within the framework of the project. To do this, you can, for example, click on the "Opportunity" tab, then on "New" and enter the corresponding customer account in the "Account name" field. Alternatively, you can also go to the related list of your customer account, click on "Opportunity" and then "New". Fill your opportunity with the information relevant to you and select a phase according to your business process.
You can then click on "Choose price book" via the drop-down menu in the "Products" related list. Select the price book that contains the products relevant to your project. Then you can select your desired products via "Add products". To determine the order of the products for an opportunity, select the option "Sort products" in the "Products" related list.
 X
X
Alternatively, you can create a quote right away (see "Creating a quote" in the next step) and create your quote in the related list "Quote line items" via "Add products". As soon as you synchronise the quote, the opportunity products are created accordingly.
Important note: Before this step, it is important that you have created roles, products and ticket templates. Make sure that you have added your products to an active price book and that you have assigned the corresponding ticket templates to the products via the button "Template link". This enables your projects to generate automatically from the stored information.
4.1.2. Creating a Quote
Then create your quote via the "Quotes" related list on the opportunity and select "New quote" in the drop-down menu. You will automatically find your products in the related list "Quote line items" if you added opportunity products in the previous step. Otherwise, you can add products to your quote via the "Add products" button on "Quote line items". Afterwards, check whether your offered products are in the right order and, if necessary, re-sort them via "Sort products".
 X
X
Here you can also specify whether your offered services are to be billed as a flat rate or according to time. To do this, click on the respective quote line item and edit the "Billing method" field. It is possible to charge a flat rate as well as according to time in a quote.
In the "Details" tab, you can find general information about the quote, as well as the "Discount" field, where you can specify a discount in percent on the quote. This discount only applies to the monetary amount of the opportunity and not to the offered hours and estimated hours. The reason for that is that the discount only affects the price and not the workload that is needed to complete the project.
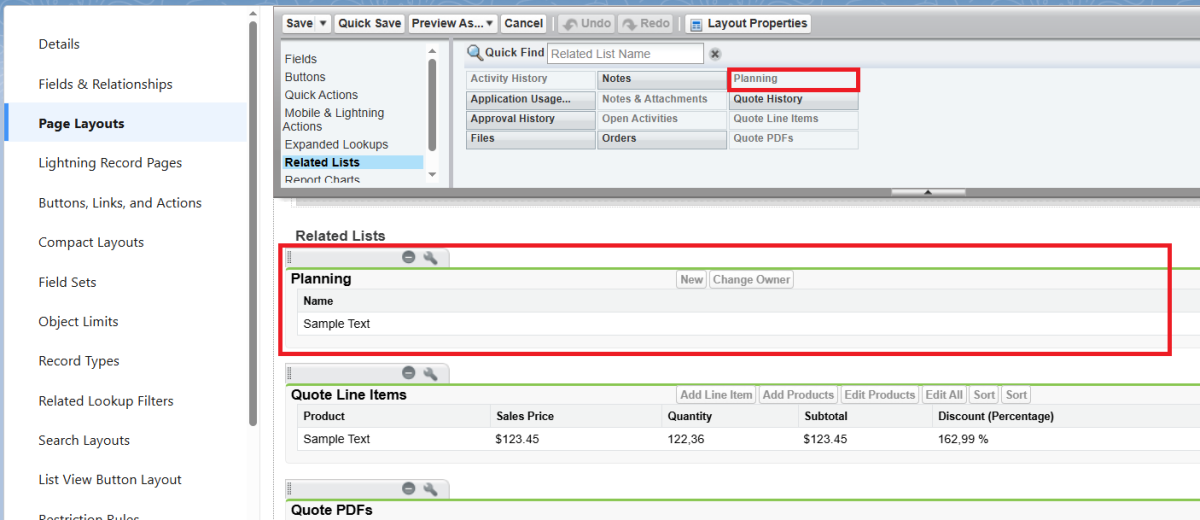
Planning
In the related list "Planning" you will already see a list of work orders, the tickets, on your quote. The tickets are created from the ticket templates that are assigned to the respective product (see: "Creating ticket templates"). Which tickets are created in the related list "Planning" and assigned to the quote is thus determined by the products you have added as quote line items.
In the quote, you have the possibility to call up an interface via the button "Edit plannings", in which you can specify planned tickets more precisely, assign roles and estimate efforts. In this way, you can already enter the project planning at the quote level. By clicking in the fields of the column "Order", you can specify the order in which the individual tickets are to be sorted. You can then use the "Sort" button to make changes to the order.
By clicking in the field area "Role" you can open a drop-down menu of the available roles and thus define a role for the processing of the work step (ticket). The roles available here can be created for you by the EasyFlow Projects Administrator.
By clicking in the field area "Estimated hours" you can enter the estimated effort for the processing of the respective step. Enter the hours here as a numerical entry (decimal places are also possible). By means of an automation, estimated efforts are transferred to the underlying quotation document item when saved and the subtotal is calculated accordingly.
 X
X
By clicking on the button "Add planning(s)" you can add further work steps that you would like to quote. A list of all ticket templates will be displayed and you can add the desired tickets as work steps to your quote by ticking them and clicking on "Add planning(s)" again. Your EasyFlow Projects administrator can create the ticket templates for you.
If there is no ticket template available that corresponds to your wish, simply click on "Add planning(s)" without selecting anything and an empty line will be created in which you can freely configure all fields.
Note: Please remember to click on the "Save" button when you have finished editing!
When you have finished creating the quote, you can have it created as a PDF using the Salesforce standard, for example, and send it to the customer. If the customer accepts and places the order, you can change the opportunity phase accordingly; by default, "Closed Won" triggers the automation stored in the phase settings to automatically generate a project (see "Managing phase settings").
You will find the new project in the tab "Project" or in the related list "Projects" on the opportunity. This project already contains all the information from the quote. The individual products stored as quote line items can be found as so-called "sub-projects" in the corresponding related list. The corresponding tickets, created from the planning data records of the quote, are assigned to the sub-projects.
Note: You can create several quotes, but remember to synchronise the final quote with the opportunity. You can do this, for example, via the "Start synchronisation" button at quote level.
4.2. Editing Your Project
After you have successfully completed the above steps and your project record has been created, you can click on the newly created project record in the "Projects" related list of your opportunity or open the project via the "Project" tab and start the implementation.
To support you, you can click on the drop-down arrow next to the status path and have the "Guide to Success" displayed.
 X
X
4.2.1. Adding Project Members
You can now easily add project members to your project via the "Edit Members" button. You can add new members via the section "Add project member". A selection of your stored roles for processing the ticket is already displayed. Click on the drop-down menu to select the role to which you want to assign a project member. Then you can easily link a user to the project role by clicking on the magnifying glass in the field area "User". A small window opens in which you can search for users.
When you are done, click "Save" and you will be taken back to your project record.
 X
X
The status of the project now automatically changes to "In planning".
4.2.2. Implementation planning
If you have successfully added your project members, you can now click on the "Edit Tickets" button to access an interface in which you can easily schedule project-related tickets, assign commissioners (the added project members) and adjust or enter new effort estimates.
Note: You can only access the "Edit Tickets" button once you have entered responsible project members.
 X
X
After clicking, a new window opens in which you can assign the outstanding tickets and choose an order of execution. You can specify the following fields:
| Field | Description |
|---|---|
| Order | Here you can define the ordering of the tickets. To apply the ordering, click on "Sort" after defining the order. |
| Subject | Here you can optionally change the name/subject of the ticket. |
| Subproject | Here you can see the related subproject. |
| Description | Here you can see the description of the ticket. You can still change the description here. |
| Assignee | Here you can choose the assignee for the ticket. By default, you can choose from one of the team members with matching role of the ticket. |
| Estimated Hours | Here you can specify the estimated workload in hours. If you defined a value in "Edit Plannings", it will be shown here, too. |
| Start Date | Here you can optionally define a start date. |
| End Date | Here you can optionally define an end date. |
Via "Check", you can make sure that your estimated hours per ticket remain within the budget offered to the client. If you are above or below the hours offered, this will be displayed as a "planning deviation". A positive red value means that you have estimated more hours than offered to the client, a negative red value means that your effort estimate is below the effort offered to the client.
If you want to set a start and end date for the respective ticket, you can enter a processing period by clicking on the date displayed or by clicking directly in the field area and entering a period of time.
If you want to add more tickets, you can do so via the button "Add ticket(s)". Either select a ticket template by ticking it and clicking on "Add ticket(s)" or simply click on "Add ticket(s)" without making a selection and you will get an empty column where you can enter your information.
When you are done, click on "Save". Congratulations! Now your project is configured, you have assigned all tasks to your project team and you can start with the implementation.
Note: Click "Cancel" if you want to go back to the previous step without making any changes.
 X
X
Note: When you are done with the planning stage of your project and ready to start, set the status of the project to "In Realization". Only then will the detail pages of your projects' records track the progress correctly.
4.3. Time Tracking
If you or one of your project members is working on a ticket, you can easily track the time you need to work on it by clicking on the button "Edit Worklogs" of the ticket record. This opens an interface in which the current user is automatically entered and the current time is recorded. You can either add a fixed end time or leave the field empty, if you want to manually end the time tracking later on. You can also select another user by clicking on the drop-down menu. Please note that only project members are displayed for editing the ticket. Now you can start working on the ticket.
 X
X
If you want to end the time recording, you can simply click on the "Edit Worklogs" button again and you will be taken back to the time recording interface. The current time is then stored as the end. However, you can still edit this manually or add a comment if you want to add remarks.
When you have completed all tasks of the respective ticket, you can set the status to completed. When all tickets assigned to a project are set to "Completed", you can close your project.
4.4. Project Completion
When all tickets assigned to the project have been completed, you can close the project. When you close the project, the actual time worked is synchronised with the opportunity and the opportunity product, if you have selected the billing type "Time".
Congratulations! Now you can switch to EasyFlow Rechnungen and carry out the invoicing of the project.
4.5. Reporting and Controlling
A central function of EasyFlow Projects is the option of filtering your projects in real time according to any parameters in reports and monitoring them visually in dashboards. In addition, on the "Controlling" tab, you have an up-to-date overview of all relevant key figures on time planning, hours worked versus hours offered as well as financial key figures calculated from this, such as the currently billable hours or different margin considerations. For a list of all fields and their definition, please see "The Project Record".
4.5.1. Dashboards at Project Level
With the installation of EasyFlow Projects, you have a quick overview of the following reports on the respective project in the dashboard display.
| Type | Description |
|---|---|
| Tickets by agent and status | Enables an overview of project members and tickets per project member of the project in the corresponding status. |
| Tickets by status | Enables an overview of all tickets assigned to the project according to status. |
| Tickets by completion | Enables an overview of all tickets assigned to the project after completion. |
4.5.2. More Dashboards
You can find more dashboards that give you a visual overview of the project progress as follows: To do this, go to "Dashboards" in the App Launcher and to the "EasyFlow Projects Dashboards" folder. You will find the following dashboards here: Overview, Project History, Project Overview, Team History and Team Overview.
Dashboard "Overview"
| Type | Description |
|---|---|
| Currently Open Time Tracking | Shows whether you currently have an open time recording in which you log effort. |
| Time Recorded this Nonth | Allows an overview of the total time recorded in this month across all projects and tickets. |
| Tickets Closed This Month | Allows an overview of all completed tickets in this month. |
| Time Recorded Monthly | Allows an overview of the total recorded time per month. |
| Monthly Closed Tickets | Allows an overview of the number of total completed tickets per month. |
Dashboard "Project History"
| Type | Description |
|---|---|
| Completed Projects | Allows an overview of all completed projects by completion date per month. |
| Completed Tickets | Allows an overview of all completed tickets by completion date per month. |
| Completed Time Tracking | Enables an overview of completed time entries sorted by end date and responsible project member. |
| Billable Sum | Allows a monthly overview of the total billable amount by project and completion date. |
| Margin (absolute) | Provides a monthly overview of the total absolute margin by project and completion date. |
| Completed projects (by billable amount) | Shows the top 10 of all completed projects by billable amount. |
| Completed projects (by margin) | Shows the top 10 of all completed projects by absolute margin. |
Dashboard "Project Overview"
| Type | Description |
|---|---|
| Open Projects (by status) | Allows an overview of all open projects by status. |
| Open Tickets (by status) | Enables an overview of all open tickets by status. |
| Open Projects (by billable sum) | Enables an overview of all open projects (in status Open, In Planning, In Implementation) sorted by billable sum. |
| Open projects (by margin) | Enables an overview of all open projects (in status Open, In Planning, In Implementation) sorted by absolute margin. |
| Open projects (after completion) | Allows an overview of all open projects (in status Open, In Planning, In Implementation) sorted by completion. |
Dashboard "Team History"
| Type | Description |
|---|---|
| Completed Tickets | Allows an overview of all completed tickets by completion date and user per month. |
| Completed Time Tracking | Allows an overview of all completed time entries by hours and users sorted by the respective month in which the end date lies. |
Dashboard "Team Overview"
| Type | Description |
|---|---|
| Open Projects | Enables an overview of the number of all open projects (status Open, In Planning, In Implementation) per user. This provides an overview of how many open projects the employees are currently project members in. |
| Open Tickets | Enables an overview of all open tickets (status Open and In Progress) per user. This provides an up-to-date overview of how many open tickets are assigned to a staff member. |
| Estimated Hours | Enables an overview of all open tickets (status Open and In Progress) per user, sorted by estimated hours. This provides an up-to-date overview of how many open tickets are assigned to a staff member and how much time is spent on them. |
5. Error Handling
The more diverse the functionality of a system, the more complex the configuration. Errors happen in the process. A central focus of EasyFlow Projects is to support users in analysing configuration errors as best as possible and to avoid input errors directly.
In the event of errors due to incorrect entries or connection problems, the user receives a corresponding message. If there is no indication of an error, it can generally be assumed that the triggered action was successful.
Displayed error messages partly originate from the application EasyFlow Projects (e.g. through validations during data entry) or Salesforce itself.
In the following, you will find error messages that can be displayed by the EasyFlow Projects application and the corresponding possible solutions:
| Error Message | Solution |
|---|---|
| Quote synchronisation is missing. The current quote must be synchronised before project creation. | Here it was forgotten to synchronise the accepted offer. This can be done via the "Start synchronisation" button on quote level. |
| Phase is invalid. Please enter existing and active opportunity phase. | If the phase setting has been stored, but no corresponding picklist value is stored and active for the "Phase" field on the opportunity object. |
| Licence missing. Assign an Easyflow licence to the corresponding user and try again. | In this case, a user was stored in the notification settings or when adding a project member, to whom no corresponding EasyFlow licence was assigned. Go to Setup > Installed packages > Manage licences for EasyFlow Projects and assign a licence to the user. |
| Sub-project with accounting type "time" without time recording. Sub-projects with accounting type "time" must have recorded time. | Here, a project should be set to "Completed" although no effort has yet been set on a sub-project of the accounting type "Time". |
| Action not allowed for users with licence type "Platform". | When the project is completed, the automation updates fields at the opportunity level. As access to opportunities is not possible with a platform licence, project completion is prevented by users with a platform licence. |
If you are unclear about an error message, we recommend consulting the Salesforce administrator responsible for the installation.